作者:5h网络 来源:互联网 发布时间:2022-05-03
鉴于我只知道用阿里云服务器安装博客,别的用途不了解,所以我就去安装wordpress。
而由于我看的教程有点问题,有的问题搜索引擎解决不了,我要么瞎折腾整好了,要么重装系统,最后一次挺顺利,半小时左右装好,但后续还有各种问题,一个个解决掉了。于是记录下来方便后(面要搭博客的)人。我参考的阿里云代理发的一个教程阿里云Centos7安装LNMP环境和wordpress(有点坑,但还是不错的)。
1.安装Nginx
? 1 2 3 #yum install nginx #配置文件处于/etc/nginx #systemctl start nginx #启动nginx #systemctl enable nginx.service # 设置为开机启动测试:123.206.57.252 打开公网IP可看到nginx的页面。
2.安装MySQL
? 1 2 3 4 5 6 7 8 9 10 11 #rpm -Uvh http://dev.mysql.com/get/mysql-community-release-el7-5.noarch.rpm #yum repolist enabled | grep “mysql.-community.” #yum -y install mysql-community-server #安装社区版,快可3分钟,慢或40分钟 #systemctl start mysqld # 启动mysql #mysql_secure_installation # mysql安全安装,root密码初始为空,自己设置 #mysql -uroot -p mysql>create database wordpress; #创建wordpress数据库 mysql>use wordpress; mysql>quit #或者exit3.安装PHP
3.1安装php-fpm
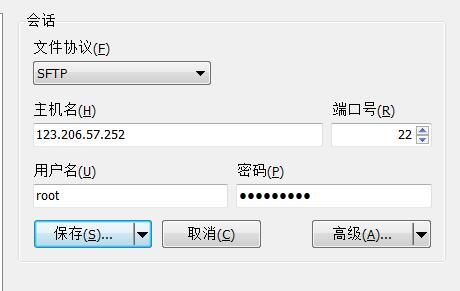
? 1 2 3 4 5 6 #yum install php-fpm php-mysql #systemctl start php-fpm # 启动php-fpm #systemctl enable php-fpm # 设置开机启动 #mkdir /usr/www #chown -R apache:apache /usr/www3.2在Winscp登录主机
winscp菜单-选项-编辑器-默认编码,选择UTF-8。
设置好ssh:高级-ssh-验证-密钥文件。
密码是云主机的密码,修改密码要先关机。

3.3修改Nginx配置文件
打开/etc/nginx下的nginx.conf,其中server部分修改如下:
? 1 2 3 4 5 6 7 8 9 10 11 12 13 14 15 16 17 18 19 20 21 22 23 24 25 26 27 28 29 30 server { listen 80 default_server; listen [::]:80 default_server; server_name ffflipped.cn; root /usr/www; # Load configuration files for the default server block. include /etc/nginx/default.d/*.conf; location / { index index.php; try_files $uri $uri/ /index.php?$args; } rewrite /wp-admin$ $scheme://$host$uri/ permanent; location ~* ^.+.(ogg|ogv|svg|svgz|eot|otf|woff|mp4|ttf|rss|atom|jpg|jpeg|gif|png|ico|zip|tgz|gz|rar|bz2|doc|xls|exe|ppt|tar|mid|midi|wav|bmp|rtf)$ { access_log off; log_not_found off; expires max; } location ~ .php$ { try_files $uri =404; fastcgi_split_path_info ^(.+.php)(/.+)$; fastcgi_pass 127.0.0.1:9000; fastcgi_index index.php; fastcgi_param SCRIPT_FILENAME $document_root$fastcgi_script_name; include fastcgi_params; } }保存后重载nginx
#systemctl reload nginx
在/usr/www 目录中创建 index.php
测试:123.206.57.252 或者解析好的域名http://ffflipped.cn 可以看到hello world!
4安装wordpress
4.1搭建站点
下载并解压好wordpress安装包,用winscp将/wordpress下的文件夹和文件全部上传到/usr/www/目录下。
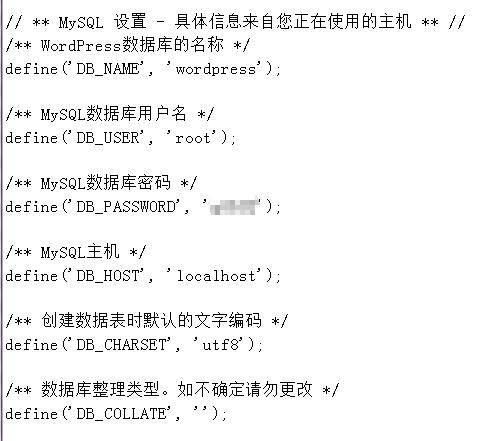
修改wp-config-sample.php的MySQL数据库信息,里面MySQL主机就填localhost,而不是公网IP之类的。

保存后访问 123.206.57.252 填写站点信息,接近成功了!
4.2权限设置
但是会发现写博时不能上传图片,后台不能安装插件和主题,这时候就是权限问题。
wp-config.php文件最后加上下面这句:
再去执行命令 1 2 #chmod 777 /usr/www -R #这里的-R是递归子目录、文件 #systemctl reload nginx